Challah is an immensly personal bread for me. In the quarantine of spring of 2020, I must have tried 4-5 different versions before I decided to create my own. Some weren’t eggy (is that a word) enough. Some weren’t sweet enough. Some used so many eggs and egg yolks that I did’t think the recipe was practical. So I created my own through experimentation.
One thing I learned is that rise time for encriched bread dough is really hard to estimate. This is a double rise recipe. I ended up going with longer rises to help the yeast really get to work and to create the super soft inside that I have always liked. Fewer crumbs and a smooth, soft sweet taste. I have found that I really can’t let the dough rise for too long in either rise, although I found 90 min to 2 hr for each rise about right. I also found that keeping them even was important because you want some of the rise to happen in the shape so you get the tight braid and thickness that makes for good french toast the next day. You really don’t want to under rise as then the insides are too tough.
Another note is that getting the water correct is important. Start with a little less water and add only as necessary to create a smooth dough. Too much water and the dough gets sticky. It should have just a little “tack” to it.
Mike’s Challah
This is my personal adjusted recipe for traditional Jewish Challah.
Ingredients
Dough
- 1 tbsp instant yeast make sure it is fresh
- 1 tbsp salt
- 1 1/4– 1/2 cup warm water Start with 1/4 and be prepared to add a little more if necessary
- 3 cups flour King Arthur or other white flour
- 3 cups bread flour High Gluten Flour
- 1/4 cup vegetable oil
- 1/4 cup honey
- 1/4 cup sugar
- 3 eggs extra large or large (or add an extra yolk)
Wash
- 1 egg scrambled
- 1 tbsp water
- 1/2 tsp honey (optional)
Instructions
-
If you have a Kitchen Aid or other mixer, feel free to use to make the dough. Otherwise bring together with your hands.
Prepare mixing bowl. Add Yeast and 1 cup of the water and let sit for 5-10 minutes until yeast is activated.
-
Put 1/4 more water in and reserve the rest. Put all remaining ingredients and mix until a dough forms. Make sure to incorporate all of the flour.
-
You should have a dough that is a tough, a little yellow and maybe even a little flour/granular. Its OK. Now take it out and knead the dough. As you knead the dough it should further incorporate the flour/sugar etc. you want to end up with a smooth dough that has some flex in it. If it seems too flaky add small amounts of water at a time (a little goes a long way) and keep kneading. You know you have gotten to the right state when it is nice and smooth and when you press with a finger the indent stays.
-
Place the dough in a greased bowl and let it rise. The first rise is anywhere from 60 min to 120 min (2 hr). You want to have the dough double in size. I like to find a warm space at around 70+ degrees to let the dough rise.
-
When you have the dough and it has doubled in size, take it out and remove from bowl. You can make 1 nice family sized challah that will give you leftovers or two smaller loaves.
Its time to braid the dough. You cut the dough into even pieces 3/4/6 and make the braid. Plenty of videos on youtube but my favorites are:
-
Once braided, place on a greased baking sheet and cover and let rise for 60-90 minutes. The dough will get nice a puffy.
-
Preheat oven to 375 as the dough is finishing its rise.
-
Mix the egg wash (1 egg, water, little honey)
-
Brush the wash all over the challah
-
Bake at 375 for 20 minutes and check the color. If you like the lighter color, tent the bread with aluminum foil for the last 10 minutes other wise let it finish in for 10 more minutes. If you want, you can use a thermometer to check that the inside has reached 210.
-
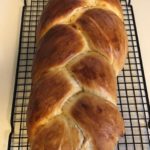
Remove bread from over and place on a rack. You want the bread to cool on a rack and not in the pan because if you leave it in the pan the bottom will over cook and become hard and crusty.

